Monday, November 25, 2013

Sour Cherry Scones

These little morsels are satisfying, just sweet enough, packed with nutrition, and easy to make if you have a good supply of this and that in the kitchen. You could replace the dried sour cherries with something else, like cut up dried apricots, or even raisins or pieces of dates. The dried sour cherries add an element of depth and character that a totally sweet thing doesn't. In fact, dried blueberries might be another good example of that sweet-tart layering in a scone. I decided to try something totally new and use coconut water (the less sweet type, about 7g sugar in 8 ounces) for liquid, since there was already some protein from the chickpea flour etc. Nice omega 3's from the chia, plenty of good stuff here, and tasty! I also used a bit of jam to finish up a jar in the fridge... and you can do that too with any flavor you have around, or just add a bit more sweetness with honey or maple syrup or some form of sugar if you use it.

Sour Cherry Scones (makes 6)
pre-heat oven to 375F

1/4 cup golden flaxmeal (or grind your own flaxseeds)
1/4 cup potato starch
1/4 cup chick pea flour (I wonder if ground quinoa would work here? maybe next time)
1/2 cup brown rice flour
1 tsp baking powder
1 TBLS chia seeds
1/4 tsp salt
1/2 tsp lemon zest

1-2 TBLS jam of your choice
1 tsp vanilla
1/2 cup coconut water (NOT MILK)

1-2 TBLS dried sour cherries
1/2 cup walnuts

Mix all the dry ingredients (1st 7on the list) plus the lemon zest.
Mix jam, vanilla and coconut water in a small bowl.
Add wet to dry, mixing sparingly.
Toss in the dried cherries and crunch up the walnuts into the size bits you like to find in your scones.  Mix this all together until it is consistently textured, but don't overdo it.

Plop extra large tablespoon ovals onto a non-stick silicone baking sheet, on a cookie sheet or other pan. Allow 35-40 minutes for baking but set your timer for 25 minutes and test for doneness, being ready to put them back in for up to 10 more minutes.

They will begin to brown and crisp a bit on the outer edges, but remain a little moist inside. These are scones -- not muffins -- and go well with marmalade, honey, or nut butters.

Saturday, November 9, 2013

Oat Bran Muffins, with fresh & dried fruits

Our first prolonged snow flurries decorated the fallen apple leaves when I got up this morning, calling out for morning muffins. I had one ripe banana and decided to try oat bran muffins, with flecks of carrot for color, crunch of walnuts, sweetness of raisins and freshly grated apple. With a little help from maple syrup and apple jelly syrup (a failed jelly experiment that has been great for baking), these were even sweet enough for my husband to eat them without the usual dab of honey. If you use no oil, like I do, you will need silicone non-stick muffin cups. The combination of chick pea, brown rice, oat bran, flax and all makes for a nutritious vegan muffin without trading away anything at all in the way of texture or flavor or satisfaction.


OAT BRAN MUFFINS WITH FRESH & DRIED FRUITS

1/4 cup chick pea flour
1/4 cup brown rice four
1/4 cup potato starch
1/3 cup oat bran
1/2 cup sorghum flour
2 TBSP ground flax seed
1 TBSP nutritional yeast
1 tsp baking powder
1/4 tsp sea salt
1 TBSP maple syrup
1 TBSP apple jelly syrup (or use more maple syrup)
1/2 cup almond milk
1 mashed ripe banana
1 grated carrot
1 grated (peeled/seeded) apple
1/4 cup raisins
1/4 cup walnuts

Preheat oven to 400F.  (You will turn this down after a few minutes of baking.)

Mix all the dry ingredients (first 9 on the list).
Mix all the wet ingredients (the next 6), leaving the raisins and walnuts out for now.
Stir the wet into the dry, making sure you moisten all the dry into a thick spongy texture.
Now stir in the raisins and walnuts, saving out 7-8 walnut pieces to stick one in the top of each muffin.

Using a big spoon (serving spoon or tablespoon) put large blobs of batter into each non-stick silicone muffin cup, sticking a walnut piece into the top for crisping and decoration. Place these on a baking sheet and put into oven for 5-10 minutes SET THE TIMER!!  TURN DOWN THE OVEN TO 350F and BAKE for another 20-25 minutes until a toothpick comes out clean. Cool a few minutes before popping out of the silicone cups -- cool a few more before eating. ENJOY THEM WARM. They can be quite moist inside from the banana... but ought to taste fully baked, not undercooked. That crisped walnut adds an important element!

Spaghetti Squash with Anytime Fresh Tomato Sauce


The bowl on our early November table has two pale tomatoes waiting to turn into something resembling summer tomatoes. The farm markets continue to offer beautiful cool weather greens and winter squash in every variety. So the dinner plan formed around a round lovely spaghetti squash, and my husband suggested that a fresh tomato sauce would be lovely. "Fresh tomato sauce?" I thought looking at him sideways.  Then I remembered my strategy at summer's end -- I had thrown piles of ripe plum tomatoes into plastic freezer bags and plopped them into the freezer. I use these in soups and chili and they taste as fresh as summer. As soon as the cold tomato hits the heat of the broth or whatever, the peelings pop right off, leaving just the succulence of the tomato. Of course they turn to mush -- but isn't that what we want in a sauce? So this evolved into another instant favorite -- sweet spaghetti squash well saturated with fresh tomato, garlic, slivered kale leaves and herbes de Provence. Oooh la la! This is a beautiful dish that takes less than an hour to make fresh.


SPAGHETTI SQUASH WITH ANYTIME FRESH TOMATO SAUCE

1 medium large spaghetti squash
6-10 cloves fresh garlic roughly chopped
8 or so fresh-frozen plum tomatoes (you could use a can I suppose)
5-8 medium kale leaves, destemmed
1/2-3/4 c water
1/2 - 1 tsp salt (your taste...)
1 TBLSP herbes de Provence
Freshly ground pepper
Sesame seed gomasio (if you want to imitate a finishing sprinkle on top)

FIRST BAKE THE SQUASH:
Heat the oven to 350F. Cut the spaghetti squash in half length-wise (from stem to end). Open the squash and scrape out the seeds and seed goop with a large strong tablespoon. Place the squash halves on a baking sheet covered with tin foil and leave in the oven for about 30 minutes, or until you can press into the peeling side and it feels soft.  This is just the right amount of time for making the sauce.

MAKE THE SAUCE:
Plop the frozen tomatoes into a sauce/stew pot with roughly chopped garlic and the water and salt. You can start with less salt and always add more as it simmers, or on the table.  Cover and heat a few minutes, turning the tomatoes once or twice so that you can pick up each tomato and squeeze off the peelings. Then add the kale, cut into slivers. I wad the leaves up on a cutting board and cut thin slices through the wadded leaves. This is not a precise science. Stir in the kale with the herbes de Provence, a bit more salt, and let this simmer covered for at least half an hour.

JOINING SQUASH AND SAUCE:
When the sauce has simmered for at least 15-20 minutes, take the squash halves out of the oven, turn them over carefully. Let them cool a little (5 minutes at least), then hold one half in one hand with a well protected hand (using an oven mit is a good technique), while scraping out the squash flesh into a large bowl. Break up the squash flesh into its spaghetti like strands with a fork. Do both halves.

Pour the sauce over the squash in the bowl and serve. People can fish down into the bowl to pull the squash out, with the beautiful layer of sauce all over the top (and the juiciest part of the sauce filtering down into the bowl through the squash).  Serve with a choice of fresh pepper grinder, sea salt, and sesame seed gomasio as possible at-table finishing touches.

Note: You can roast these squash seeds if you like. Clean off the debris, rinse them, sprinkle them with Tamari, layer them on a baking sheet and let them crisp up, turning with a spatula at least once in about 15 minutes.

Brussels Sprouts with mustard sauce

Lately my husband has been enamored with mustard. There is a tang and a depth added to a dish with just the right amount of mustard in addition to the usual ingredients. Yes, there are patterns and habits in making vegan meals every day, and mustard quite simply adds a bit of spice to life! So when I was planning a fairly common combination of brussels sprouts, onion and mushrooms as a major side dish, I chose to add a stone ground mustard to the Bragg Liquid Amino, water and dash of black pepper. It was well worth it, and turned this one-pan dish into an instant favorite.


BRUSSELS SPROUTS WITH MUSTARD SAUCE

2 torpedo (or other pungent red) onions
10-12 medium button mushrooms
2-3 cups or 1.5 pounds Brussels sprouts
2 tsp Bragg Liquid Amino
2 TBLSP stone ground mustard of your choice
1/2 c water
dash freshly ground black pepper

Slice the onions in thin slices, separating the rings in the bottom of a wide non-stick pan.
Clean the Brussels sprouts (cut off the tough stem ends and peel away any yucky leaves, washing off any dirt), and slice them in half vertically - cutting through from the stem end through the floret.
Brush the mushrooms and cut in quarters if large enough, or in half if smaller (use more of them if they are small).

Layer the Brussels Sprouts over the onion layer, putting the mushrooms on top. Pour 1/2 c water, Bragg's, and mustard over all of this and cover with lid. Simmer for about 10-15 minutes, stirring once or twice. Then turn off and leave covered, allowing the Brussels sprouts to steam and soften further, while not overcooking the mushrooms.

You can serve just like this, or cook a couple minutes without the lid to further reduce the mustard sauce onto the veggies.


Saturday, September 7, 2013

Sorrell soup

I think of sorrell as a tart lemony early spring green so I am delighted to see our little patch of sorrell rejuvenated by recent cooler nights. There could easily come a time in the next couple when the hard frost will banish that bright green for the winter. I broke off a couple good handfulls of leaves and headed for the kitchen with sorrell soup on my mind.  If you search for recipes you will find the French version and the Eastern European version, but every one calls for butter and/or cream. So here's my no oil, no dairy invention that was the centerpiece of a lovely lunch today and could easily be the start to a gourmet dinner. We ate this as a leftover with a heaping tablespoon of brown rice in the center, which was delicious and a bit more substantive.


SORRELL SOUP (serves 4)


2 handfuls (about 3 cups sliced) sorrell leaves
3 small potatoes with skins
1 medium red onion (I used half a huge torpedo onion)
1 medium green zucchini
4-5 cups water
1/2 tsp salt
fresh ground pepper to taste
dill sprigs (decoration & to eat)

1) Slice the onion very thinly and then chop it into bits. Cut the zucchini into small pieces (1/2 inch) and put all of this into a soup pot with about 1 cup of water. Let this simmer quietly with a little of the salt.

2) Cut the potatoes into slices and then rectangles and then little squares. Throw the potato pieces into the pot and add the rest of the water, deciding if you need a little more water in order to cook the potatoes and still have some broth. Cook this for about 10-15 minutes until everything is soft.

3) Wash the sorrell and break off the stem parts up
to the leaf --you can leave the stem part attached to the leafy part. Pile this up on a cutting board with the leaves all going longwise. Cut across into little ribbons.

4) JUST BEFORE SERVING, stir the sorrell into the hot soup, mixing and stirring until the sorrell begins to change color. Remove from heat and using a hand blender, puree the whole thing.

5) Salt to taste, serve into bowls, grind a little fresh pepper on top with a sprig or 3 of fresh dill leaves. This looks beautiful and tastes great. The subtle balance of substance from the potato with tang from the sorrell is blended with the sweetness of the zucchini and given depth by the onion. The dill gives a counterbalance to the zing of the sorrell. What could be simpler or more yummy Spring or Fall?

Wednesday, September 4, 2013

Brussels Sprout Balls


We bought a stalk of first of the season Brussels sprouts. When I steamed them to turn them into the main beautiful course for a dinner plan, it turned out that they just didn't have the flavor I hoped they would. They were immature, a little bitter, and quite plainly, not up to being the star of the show. I cooled them, put them in a bag in the fridge and regrouped dinner around spiced tempeh and quinoa. That all went fine but I was left contemplating what to do with a stalk's worth of young not-so-interesting Brussels sprouts. Today I came home from teaching and decided to just throw them in the blender, chop them into bits and turn them into something yummy. It would take lots of other ingredients with flavor to offset them, but they could definitely provide a texture that could make an interesting dinner. These are nice with any kind of sauce you like. They are good with both applesauce and kimchi!

Not expecting greatness, I didn't photograph the process -- but you can imagine how it looked.

BRUSSELS SPROUT BALLS (makes a dozen golf-ball sized crisp balls)

2 dozen (at least) small sprouts - a stalk's worth,
  chopped in a blender to make about 5 cups
3 small potatoes, grated
1 good sized carrot grated
1 small onion chopped fine (or several Vidalia slices)
3-4 sundried tomatoes chopped fine
3-4 garlic cloves smashed and chopped fine
2 tsp Bragg Liquid Aminos
1 tsp white Miso
1/3 cup buckwheat groats, ground fine
1/2 cup chick pea flour
1/8 tsp paprika
1/2 tsp sage
1/2 tsp cumin
salt to taste

1. Grate and chop all the veggies putting them all together in a good sized bowl.
2. Put the flour-like materials together with the spices and add to the bowl, mixing in the Bragg's and miso and combining until it is mostly uniformly mixed.
3. Heat oven to 375F, put a sheet of parchment paper in a baking pan (or use a silicone sheet).
4. Form 12 golf ball sized balls with your hands, and lay them out on the paper, lightly salting them. Bake for 30-40 minutes or until just as crisp and nice as you like!

Spicy Tempeh Quinoa & Apple Potato Salad


It is no longer as common as it once was that my little family gang has dinner together. It was our tradition the entire time the boys were in school, living with us, that we tried to settle at the table once a day for what has now become officially "Family Dinner." It was an important time to look each other in the eye, hear the tones of voice, check in with the states of mind and relationship. With the prospect of having a long day myself, my husband's first day back at school meetings, and my now 20-something sons assembling for dinner, I knew I had to figure things out before heading over to teach my evening class. This combination of garlicky quinoa with pieces of spicy tempeh really hit the mark for a main dish and was easy to put together ahead of time. I also made an apple-onion-potato salad in advance and put sliced fresh cukes in the fridge to absorb a tarragon-vinegar treatment. Dinner was completed by quickly chopping and assembling a room temperature tomato-peach-avocado-basil-balsamic vinegar salad and providing brilliant green on the table by quickly steaming garden fresh haricot verts and squeezing on fresh lemon juice with a splash ume plum vinegar.   Not surprisingly, there were no leftovers, though the spicy tempeh quinoa and the potato salad would have made a lovely lunch the next day.

Spicy Tempeh Quinoa

2 cups red quinoa
5-6 large garlic cloves
5-6 mushrooms (cremini, white, whatever)
1 slab of tempeh (I used flax tempeh but any will do)
1 cup frozen petite peas
3-4 tsp Bragg Liquid Amino
1-2 tsp Sriracha chili sauce

1. Cut the tempeh into 2 long halves, then into small rectangles. Put these in a shallow wide soup bowl and drizzle with 2 tsp Bragg's and the Sriracha.  Put in the fridge and let sit for at least an hour.
2. Meanwhile, dry roast the quinoa for about 5-10 minutes in a large flat pan, shifting the grains now and then to avoid any uneven heating. Add about 2 cups of water and chopped garlic. Cut the mushrooms into quarters and throw them into the quinoa as well. Cover the pan and let the quinoa cook for about 10-15 minutes, adding at least 1 tsp Bragg Liquid Amino to the quinoa.
3. As the quinoa is cooked, fluff it up, throw in the peas and add the spicy Tempeh. Stir this gently and serve!

Apple-Onion-Potato Salad

4-5 small potatoes (white and red)
half a Vidalia onion, or 1 medium sweet onion
1 large Honeycrisp apple (or whatever you like)
1/3 cup Tahini
1 Tblsp Tamari
3 Tblsp water
1 tsp agave syrup
1tsp finely grated carrot
1/4 tsp grated ginger
1-2 tsp Dijon mustard
1-2 tsp stone ground mustard
1-2 tsp cider vinegar
1/2 tsp salt

Cut the small potatoes into bite-sized pieces -- about 4-6 per potato -- and boil for about 10-15 minutes until just softening.  Pour out into a colander. Chop up about half a Vidalia or sweet onion into little pieces though not minced.  Peel, core and chop one large Honeycrisp apple into small pieces.  In a cup or bowl, pour 1/3 cup tahini, add 1 Tablespoon tamari, 3 Tablespoons water, 1 tsp agave syrup, 1 tsp finely grated carrot, 1/4 tsp grated ginger, 1-2 tsp Dijon mustard and 1-2 tsp stone ground mustard. You can also add 1-2 tsp cider vinegar and 1/2 tsp salt. Mix well and pour over the chopped vegetables and apple and mix gently. Chill and serve!

Tuesday, September 3, 2013

Fresh Veggie Tortilla Lasagne


The heat of summer, the zucchinis are coming in, fresh onions and tomatoes sit on the kitchen counter and there's a package of old corn tortillas, drying and cracking in the fridge. It's hard for me to throw away good food, so I decided to use those tortillas and their cracked qualities to make a fresh lasagne without pasta. The fresh basil, garlic and tempeh layer added a wonderful pesto flavor, and the chickpea flour sauce not only bound things together but added an important element of creaminess. This is a good dinner for two plus salad or greens, with great lunch leftovers (hot or cold!).


Fresh Veggie Tortilla Lasagne

1 medium large zucchini
1-2 medium sweet onions
1 large potato
3-5 mushrooms (any will do)
1-2 large ripe tomatoes
1 package tempeh
1 medium sweet potato
1/2-1 loose cup fresh basil
3-4 big juicy garlic cloves or use a whole head!
2-4 drying old corn tortillas (ok, you can also use fresh ones)
1/4 cup roasted sesame seeds
salt and pepper

The sauce to hold it all together:

1/2-2/3 cup chick pea flour
1/2 tsp cumin
1/4 tsp tumeric
1/4 tsp salt
1/3 tsp ground mustard
1/4 cup soy milk

1. Slice the zucchini, onions, potatoes, mushrooms, and tomatoes in thin rounds. Tear the corn torillas into strips.
2. Layer in a wide (lidded) cast iron enamel casserole pan as follows:
1st: zucchini & onion & sweet potato
2nd: layer of corn tortilla strips (use about half)
3rd:chopped basil and garlic with crumbled tempeh (think pesto...) dash of salt and pepper
4th: potato and mushroom
5th: tomato
6th layer of corn tortilla strips -- leave a little space to bring out a little of the underneath layer of tomato
top: sunflower seeds

3. Make sauce by adding all the dry ingredients to a bowl first, then stir in the soy milk. You can add more soy and/or more chick pea flour if you want more sauce.

4. Pour the sauce over the top of the whole thing -- drizzling it so that you get it over most of the surface.

5. Bake with the lid on at 350F for about 30 minutes.  You can stop at this point and save this to finish later or tomorrow ... but if you want it soon, turn up the heat to 450F take off the lid and crisp for 10 minutes.  Serve hot and marvelous. This is yummy hot or cold the next day.

Monday, September 2, 2013

Minestrone Soup or Stew - Fresh Veggies


This is the season of garden abundance and even my little plot offers us whatever it can. Too much rain and many of the tomatoes split. Rain meant that I couldn't pick the beans either (terrible for the plants to handle them when wet) so my rejuvenated beans produced more succulent beans than expected.  Corn is best fresh off the cob, but it will taste nearly as marvelous if cut off immediately upon cooking and cooled, tossed in a freezer bag and frozen for mid winter.  What to do with a kitchen counter covered in harvested veggies? Make minestrone! When you add the al dente pasta it will absorb a good bit of the soup broth, so if you want it to stay soupy, add a little more water, and if you want to eat it more like a stew, cook down the broth a bit.

Here's my impromptu version.

Garden Plenty Minestrone - makes 2 quarts

2-3 cups of 1" green bean pieces
1 medium yellow squash cut into slices
1 large onion, cut fine or slices
1 can chick peas (or red kidney beans) or fresh cooked
2 small stalks celery chopped (with leaves if you like 'em)
3 cups chopped chunks of ripe tomatoes
2 carrots cut into pieces
1/2-1 cup corn kernels
3-5 cloves smashed and chopped garlic
1 Tablespoon dry oregano (or more if fresh)
1/2-3/4 cup fresh basil leaves chopped roughly
1 tsp Bragg Liquid Amino
Springs of fresh parsley for garnish
4-6 cups water for soup
4 ounces firm tofu cut into small pieces (optional)
black pepper, grated fresh
dash of salt
1 cup brown rice pasta of your choice & water to cook it

1. Cut up the veggies into pieces you want to find in your soup -- though squash and tomatoes will soften and some of it will become broth.
2. Add all the veggies to a good sized pot, with 4 cups of water and bring to a boil, then turn it down and simmer with a lid on at such an angle that steam can escape.
3. In a separate pot, boil up 4-5 cups of water and add the 1 cup of brown rice pasta, cooking at a boil for about 5 or 6 minutes, drain in a colander and set aside.
4. When veggies are nearly all softened, remove the lid, add the tofu and either add liquid if needed to keep it soupy, or let the liquid cook down a bit. Turn the whole thing off, add the pasta and stir. Salting to taste and adding fresh ground pepper and a sprig of parsley.

Two Dish Curry Dinner

Garlic scapes have their own timing and when it is the moment to cut them in order to promote the growth of the garlic bulb, well, something has to be done with them. They are sweet and subtle, but definitely with a garlic tendency. So I thought I'd make something sweet and subtle. It ended up with tofu, scallions (that come at the same time as the scapes it turns out) and spinach as one curry, and potatoes with scapes and red and poblano peppers as the base of the other. Since we had no chutney, I cut up an amazingly ripe plum, which served exactly the same purpose! I'm going to let the pictures tell this story -- you can use whatever curry spices you like. I soaked the little cubes of tofu in  paprika, cumin, Bragg Liquid Amino and tumeric before adding it to the tender young spinach leaves with a little water. The scapes and potato chunks had to cook a little on their own, separately, and then came together in their respective dishes, scapes with tofu and spinach, and potatoes with the peppers, some dissolved miso and a little water with a dash of cumin and coriander.  It's best to use non stick pans, but the tofu dish can be in a regular pan so that if you only have one, use it for the potatoes. This is lovely with rice, or applesauce, or a crisp lettuce salad on the side.

  
cut scapes into 1" pieces
adding curried tofu to scapes


add spinach to tofu/scape pan

combine parboiled potato, both peppers, onion


ENJOY!
keep scraping and turning potatoes

Garden Rescue: Green Bean & Tomato Casserole


Away from our August garden for a whole week, I came back to take on the challenge of making something delicious from the wreckage. Our pretty "Black Prince" tomatoes all split in concentric circles from the rain, and the slugs had a feast. The "provider bush beans" had recovered from their mid-summer doldrums and produced an enormous amount of fresh and tasty overly large green beans. When asked what he might envision as a casserole with green beans, my husband said, "maybe millet? mushrooms? some kind of creamy sauce?"  And so it began. This dish doesn't require over-the-top garden materials, and could actually be made any time with a variety of tomatoes, green beans, millet, mushrooms, onion, garlic, corn, and a tahini-based "creamy" sauce. I threw sesame seeds on top for fun.

Green Bean & Tomato Summer Casserole
(easily serves 4)

4 cups of chunky cut up mixed tomatoes (green/red)
3 cups green beans, cut into 1-1.5inch pieces
1 cup corn kernels
4 large white mushrooms, sliced and then rough cut (or whatever you like)
2 medium onions, chopped fine (your choice, I used red tropea onions)
2 cloves fresh garlic or use powdered garlic
1 cup organic millet
2 cups water to cook the millet
2 cups water to blanche the beans
1/4-1/2 cup water for "creamy sauce"
2 tsp Braggs Liquid Amino
1 tsp dry tarragon
2 Tblsp tahini
1 Tblsp tamari
1/4 cup water
1/8 tsp tumeric
1/8 tsp mustard powder (or mustard)
2-4 Tblsp sesame seeds

1. Bring the millet to a boil in the water over medium heat and then turn to low for about 15 minutes, turning off and covering when it begins to look as though all the water is gone.

2. Wash and cut the tomatoes into 1-3" chunks of any size or slice you like. The chunkier it is the more likely it will retain some shape, slices will disintegrate (both nice). Wash, trim and cut the green beans into 1-1.5" pieces, and in a separate pot bring about 2 cups water to a boil, then toss in the bean pieces, stirring to be sure they all make good contact with the hot water, then turn down a bit and cover for just about 2-3 minutes NO MORE because you really don't want them turning to mush.

3. In a large non-stick saute pan, put the finely chopped onions, tomato chunks, corn (fresh or frozen), mushrooms, tarragon and Bragg's Liquid Amino. Cover and saute quietly for about 10 minutes while you rinse the beans in cold water in a colander, and turn off the millet.

4. Sauce: Mix together the tahini, tamari, water, tumeric, mustard powder, and dry powdered garlic or totally crushed/smashed fresh garlic. Beat until smooth - adding water if necessary to make about 1/2-2/3 cup in all.

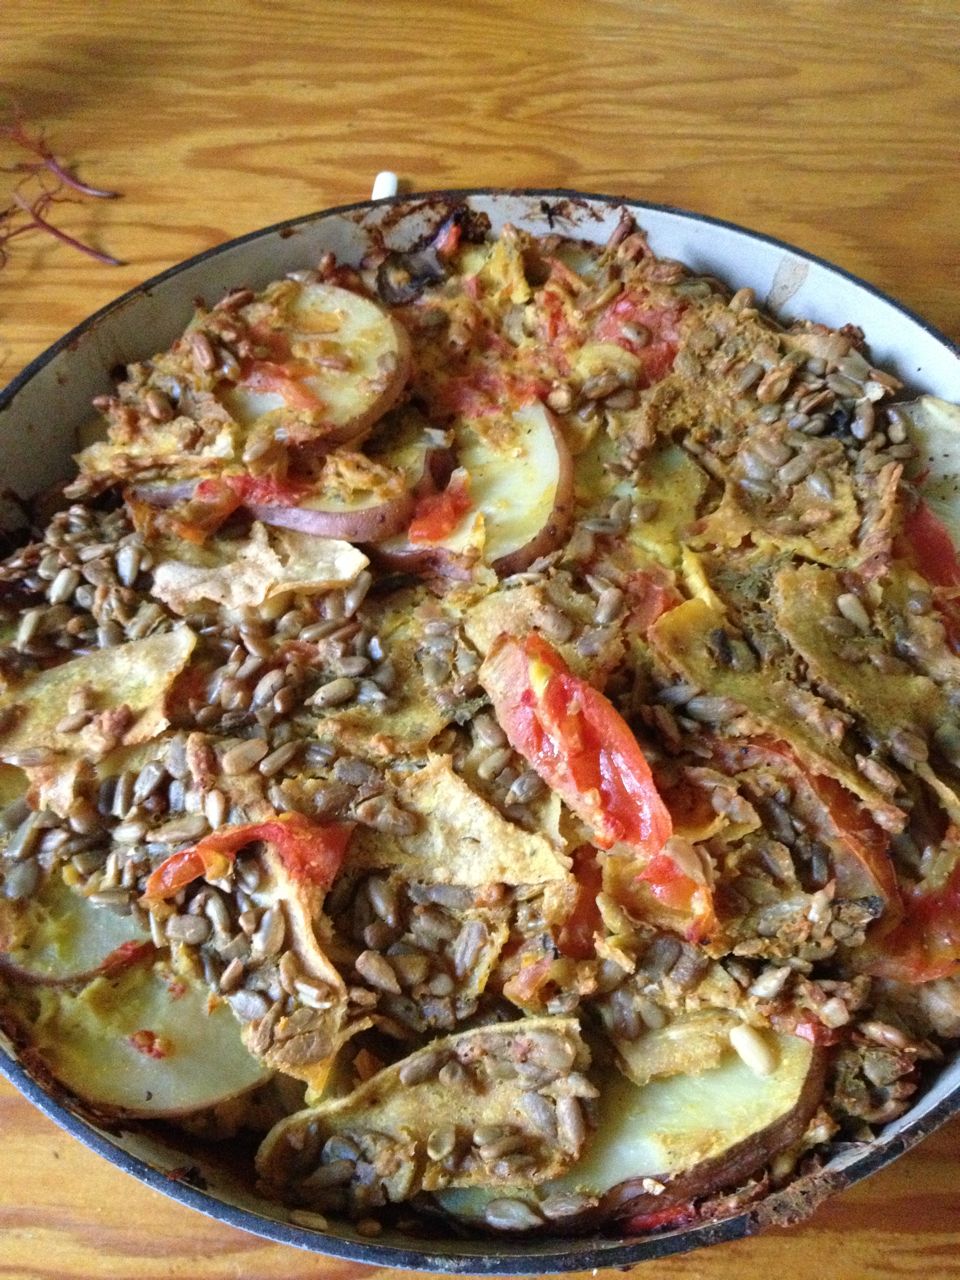
5. Construction:  In a round or rectangular cast iron enamel lidded casserole, spread out the millet, put the green beans on top of that, pour the vegetable mixture on top and gently combine. Pour out the sauce onto this in a thin concentric drizzle starting around the outside edge and working your way until there is some on the whole surface. Sprinkle with sesame seeds - as much or as little as you like.

6. Bake at 350F with the lid on for about 20-25
minutes, then turning the oven up to 450F, crisp with the lid off for about 10 minutes. Great with applesauce, arugula salad or really anything you want! (Also good cold for breakfast if you like that sort of leftover to start your day.)